On behalf of the 2RAR Association Inc.
H R (Bob) DowneyThis Paper is not meant to replace any history contained in Volume II of Robert O’Neill’s Official History of Australia in the Korean War 1950-53, other than to rectify a map and flesh out some of the actions of a Battalion in action in Korea in the closing stages of the hot war.
The Royal Australian Regiment, from September 1950 to August 1953 performed magnificently in climatic conditions no Australian soldier had previously experienced.
- There were four significant actions during this period:
- The advance, attacks and fighting withdrawals in the early stages of the war in 1950 which have never really been properly recognised.
- The Battle of Kapyong in April 1951- a brilliant defence and night withdrawal.
- The Battle of Maryang San in October 1951, a brilliant attack.
- The Battle of the HOOK in July 1953- a brilliant defence.
All four stages of the land war, for Australians in Korea, were a credit to the soldiers who fought those battles. Some were conceived and brilliantly led, others were undertaken at Company and platoon level, and many of the heaviest actions of the war were commanded by sergeants and corporals. Interspersed between the major battles was the continuum of patrol actions always designed to force back the enemy from, or at least into, his defended localities. That, in itself, is a story of physical and mental courage and great determination to get to grips with the enemy. This Paper attempts to bring the actions of 2RAR into focus, for it was this fine Battalion that conquered the might of a Chinese Division, ordered to fight to the last man, on the nights of 24/25th and 25/26th July 1953, and which left the enemy barely hanging on. At 1000 hours on the following day the Truce was declared.
It is thought that the enemy bombardments leading up to their attacks and throughout the nights in question were so heavy, so accurate and so concentrated that they had not been experienced by Australian troops since Pozieres in 1916. No vehicular traffic could escape the accurate enemy artillery along the camouflaged ring-road at the HOOK. The accuracy and strength of the Commonwealth Division artillery answered any call for defensive, harassing or counter battery fire with such accuracy and effect that the task of the Battalion was made far simpler. Nothing can, however, take away from the steadfast courage and raw aggression of 2RAR’s soldiers in their triumph of arms against a very, very competent enemy!
TRAINING IN AUSTRALIA
The Battalion had long been the training base for the infantry entry into the Australian Army from its return to Australia from Japan in late 1948. Stationed at Puckapunyal in Victoria it also served as the focal point for Victorian official occasions, Vice-Regal guards of honour and the like, and as a holding depot for the Army’s misfits, a repository for the halt and lame, those unfit for service, those awaiting Courts Martial and the generally disenchanted. This complement was ever present, in the way, and unemployable.
With the entry of Australian ground forces to the Korean War, its focus was on the retraining of former servicemen (K Force) who had enlisted from the Southern States to reinforce 3RAR, and many hundreds of such soldiers served in 2RAR for shorter or longer periods depending on their skill levels. Additionally, some Regular members of 2RAR volunteered for service in Korea with 3RAR. This situation continued till about mid 1952. By this stage LTCOL RL Hughes was commanding 2RAR with MAJ D Dimsey the 2ic and CAPT L Eyles as the Adjutant.
For the other officers, there was a constant stream in, and out as reinforcements. Some example of this can be seen from the marching out of officers in May and June of 1952. The one constant was that the Warrant Officers and senior NCOs stuck, and provided the continuity so vital in any unit. In a photograph taken in May 1952, eighteen of the 37 officers shown had left the Battalion by June. (1) Among the outstanding trainers in the Battalion since March 1951 was the RSM, WO1 Lionel McCombe, who had selected so many bright young regular soldiers and given them extra tuition before first parade every morning. These young soldiers were the backbone of the Sergeants’ Mess from that point onwards.
The Battalion was accommodated in what must have been the worst quarters built by man. The galvanised iron huts were a barrack room for a platoon. There were no beds and paillasses were provided. Hopper type windows of galvanised iron allowed ventilation. They may have been erected in 1914! This is a far cry from the single room with ensuite, and air-conditioning for today’s soldiers. Sawyer stoves provided hot water for washing of mess kits at Company kitchens, and hot showers were dreamed of.
LTCOL Hughes succeeded LTCOL Hassett as CO 3RAR in July 1952, and command of 2RAR passed to LTCOL M Austin who took over command of 1RAR in October 1952. LTCOL G F Larkin assumed command of 2RAR on 22nd September 1952. At this stage 2RAR was a fairly raw Battalion and it is to George Larkin’s great credit that what was left of the Battalion proceeded with training in skills and physical endurance. Some of the training was outside the scope of what training should have been devised for the war in Korea, but the specialist training had proceeded apace through August and September 1952, with the School of Infantry providing training for instructors for the MMG and Mortar platoon. There was the constant lack of equipment, particularly items such as signal wire, and wireless sets which would later be used in Korea. I'm sure the Anti-tank Platoon never or rarely, exercised with, nor fired, the 17pr Anti-tank gun. Strength of Rifle Companies was about 80 at this time, with concentration on building fitness and in working at night over long periods.
By the end 1952, the Battalion was ready to proceed to Korea, but further training was required in the early part of 1953, to round out about four months of training to Company level. With a departure date the Battalion completed its pre-embarkation leave and marched through Melbourne to a rousing reception. On 5th March the Battalion embarked on the MV New Australia berthed at Sydney. The number of Battalion members embarking was 603. Battalion Headquarters comprised 76, A Company numbered 67; B Company 58; C Company 55; D Company 61, Support Company 171, and HQ Company 115. (2)
An advance party of MAJ L I Hopton (2ic), CAPT D M Butler (Signals Officer), LT J Connell (Transport Officer), LT J Morahan (QM), LT K H Kirkland (2ic Mortar Platoon) and WO2 A Humphris (RQMS) had already arrived in Korea in late February 1953 for the take-over of stores and equipment from 1RAR which was then out of the line. A listing of the officers, warrant officers and senior NCO who embarked is shown as an endnote. (3)
The Battalion sailed in the evening of 5th March 1953, and arrived in Pusan, Korea, on 17th March 1953, disembarking and being trucked to Camp Seaforth, some ten kilometres from the city. Here the Battalion was issued with Cold/Wet weather uniforms and spent several days acclimatising while another advance party traveled north to join 1RAR and 3RAR at Camp Casey for a parade of the three Battalions for the first time.
The Battalion entrained on 21st March and after a stop/start journey interspersed with the odd guerrilla unit firing at the train, arrived the next day at Tongduc'on-ni, the railhead for Camp Casey where the Commonwealth Division had wintered. It was early morning and still freezing cold as the Battalion sorted itself out and occupied the tented accommodation previously occupied by 1RAR. 1RAR entrained as we detrained.
As well as being the railhead for the Commonwealth Division, the area was well equipped with support facilities such as a mobile laundry and bath unit, and medical facilities.
On 23rd March 1953, fourteen officers and 268 other ranks from 1RAR marched into 2RAR from those with time to make up for their twelve month's tour. (4) Most of the Other Ranks were allotted to the Rifle Companies. In addition there was a requirement for more reinforcements from the Reinforcement Holding Unit in Japan. The strength of the Commanding Officer is seen here in being able to direct this combined force of tried and as yet untried soldiers into a cohesive unit, capable of taking its place in the line of battle.
The remainder of March and April were taken up with intensive training for the role ahead. Much of the training was in the high range of hills on the west of the Main Supply Route, and it was an opportunity to work with other units of the Commonwealth Division. Some time was taken by the officers and Senior NCOs to familiarise themselves with the country of the Jamestown Line from observation points just short of the Main Line of Resistance.
Preparatory to moving in to the line, the Battalion transited to Area 3 taking over the site then occupied by the French Battalion. Meanwhile the two British battalions of 28th Brigade (a Brigade of two Australian and two British Battalions commanded by an Australian), the 1st Battalion Durham Light Infantry and the 1st Battalion Royal Fusiliers had occupied Hill 355 and Hill 159 respectively.
By the end of April 1953, officers and senior NCOs of the Battalion had reconnoitered the forward positions, and the Platoon Sergeants and section 2ics had been in-situ since 29th April to again familiarise themselves with the area of operations and to guide in the main body.
It was during the familiarisation period that the Battalion had its first battle casualty. The NCOs were encouraged to join the Royal Fusilier patrols, and on the night of 30th April one such patrol became involved in a fire-fight, suffering casualties. Corporal Alan George Smith of 2RAR was killed in action in that fight.
On the night of 5th May 1953, the Battalion main body entered the line and assumed command of Hill 159 with C Company taking over the left forward knoll and spurs and B Company taking over the right forward knoll and spurs of the elongated feature. Two days later 3RAR relieved the 1st Battalion Durham Light Infantry on Hill 355.
By this stage the weather was warming, and there were severe rain storms which made life in the trenches difficult. Nevertheless this did not prevent the policy of active patrolling in the valley, known locally as the ’Bowling Alley’ between the allied and enemy lines. These enemy lines, as far as 2RAR was concerned embraced four main features directly opposite Hill 159. They were somewhat higher rising in the ridgeline from our left to right and culminating in Hill 227. Locally they were named ‘Matthew, Mark, Luke and John’. The crest of these feature was some 1,000 metres from the defensive wire of the 2RAR positions. The valley floor ranged from about 250 metres to 800 metres across at the widest point, and it was in this area that patrol action by 2RAR concentrated.
Truly aggressive patrolling was entered into to wrest control of No-Mans-Land from the enemy. The US forces who had taken over during the deep winter months had failed to keep the enemy in check, and the enemy moved with some impunity up to the allied defensive wire.
From 5th May to 16th June 1953 each Platoon, conducted some thirty six patrols on the nearer spurs of our own positions, on the spurs of the enemy positions and in the valley. The majority of these were fighting/ambush patrols, although individuals conducted lie-up patrols to gain vital intelligence, or sniping, and there were usually reconnaissance patrols moving with the fighting patrols. At each mine-wire gap each platoon had to provide a standing patrol of usually an NCO and four to give warning of any enemy activity or provide covering fire for any patrol withdrawing under enemy pressure.
Other patrols included stand-by patrols to come to the assistance of any other patrol in trouble, and escort patrols for Engineers checking and maintaining the mine-wire. The patrol programme was considerably exhausting, but it generally achieved very pleasing results in forcing the enemy back to his own defensive positions.
Throughout May and early June the main contacts with the enemy were on the left flank of the 2RAR position, on West Spur, London Ridge, Durham Ridge, and on a small knoll, Kigong-ni, known as the Mound, some 400 metres from the mine-wire gap Dingo. This particular knoll was about half-way between the enemy and the allied Main Line of Resistance, and it was thought important to be in possession of that knoll to secure tactical advantage of the situation applying to the left forward Company. A number of major clashes occurred in these areas, while active patrolling to the east along the Bowling Alley was relatively quieter. The main brunt of this ceaseless night fighting was borne by C Company and D Company who shared the patrolling on the left flank. It was those young soldiers trained by Lionel McCombe who were to take command in many very difficult situations.
At the end of May 1953, D Company relieved C Company as the left forward company, and A Company relieved B Company on the right flank. The reserve Companies were located on Hill 159 Rear and Hill 210 respectively. Patrolling from these Reserve Companies continued. As there was little for the 17pr guns of the Anti-tank Platoon to do they began transforming to a large rifle platoon and took up position between 2RAR’s right flank and the left flank of the unit on Hill 355, and they conducted patrolling in the east of the valley.
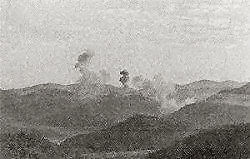
Situated within the Battalion area was a troop of Centurion tanks of 1st Royal Tank Regiment, one located on the crest line of Hill 210, another on the crest line Hill 159, and one in reserve. While these provided some reassurance in attacking any new digging activity or movement on the enemy’s Forward Defended Locality, they also caused some inconvenience in that they always drew enemy artillery and mortar fire when they themselves fired, and troops in the vicinity soon came to respect the enemy’s accuracy with mortars and with artillery. To counter some of this enemy activity, Royal Navy aircraft often conducted bombing raids, and possibly caused some consternation among the enemy. Of course, the effect of these raids was unknown, but later evidence indicated that the Chinese had a most impressive underground defence system, tunneling through from the rear slope to effect embrasures on the forward slope.
This photograph shows just such a raid on the enemy’s left flank facing Hill 355. This photograph was taken from the crest of Hill 159 Rear.
On 28th May 3RAR was relieved by the Durham Light Infantry, and went into reserve, and in turn 3RAR relieved 2RAR on 16th June 1953. The results of active patrolling might have been significant, but there was the cost in killed and wounded. 2RAR lost 10 killed, and 57 were wounded and 3 members were missing. One of these PTE Fred Speed was eventually returned from prisoner of war camps, on the signing of the Truce. The others PTE E G Bourke and PTE Son Joong Ok, a KATCOM, were presumed dead.
The Awards and Decorations for this period in the line were as follows:
The award of the Order of the British Empire was made to LTCOL George Frederick LARKIN, MAJ Kevin Britten THOMAS MC, MAJ Thomas Harry WILSON, and MAJ John Frederick Rance WOODHOUSE.
The award of Member of the Order of the British Empire was made to CAPT John Brydon WELLS, and Warrant Officer Class II Arthur HUMPHRIS.
The Military Medal was awarded to SGT William James Joseph BRUCE, and to Lance Corporal Robert RICHARDSON, and Mentioned in Despatches to SGT John ACOL, LCPL Edmund George BOURKE (Posthumous), and to PTE Harold William SMITH. (For the Citations for these and later Awards see 2RAR Association publication: Honours and Awards Presented to Members Serving with 2nd Battalion The Royal Australian Regiment 1945-1995 available from the Association)
The time spent in Reserve was not entirely restful, and from the lessons learnt during the six or so weeks in the line, much was achieved in retraining. A scare on Hill 355 held by the Durham Light Infantry had B Company moving to reinforce that Battalion. It is interesting that during this stage a type of ‘fatigue creep’ developed, probably as a result of lack of sleep, and small groups from each platoon spent 24 hours at B Echelon to try to recreate sleep patterns.

RETURN TO ACTION
The 28th Brigade was now given responsibility for the positions on the left flank of the Commonwealth Division. To the left was the 1st US Marine Division and in particular, the 7th Regiment of that Division.
The Brigade’s area consisted of a ridge line with the highest feature as Hill 146, and the whole shaped in the fashion of a ’hook’ lying on its side. The most important part of this feature was what was called THE HOOK; this jutted out towards the enemy held ridge line which, in general, overlooked all the surrounding features. The HOOK had been hard-fought over in 1951 and in 1952 when occupied by the Black Watch, In May of 1953 the Duke of Wellington’s Regiment fought a bloody battle for control of the left forward feature. They had been assisted by the King’s Regiment, who eventually relieved the Duke of Wellington’s.
In the relief of the King’s Regiment, Brigadier Wilton, Commander, 28 Brigade, decided to allocate the left forward positions to 2RAR, and the right flank bordering the Samichon River to 3RAR. LTCOL Larkin’s plans were that B Company would hold the main feature on the left forward position on the ridge, A Company would be placed on its right flank, and C Company would form the barb of the ‘hook’. The Anti-tank Platoon was to be under command of B Company as an additional, albeit reinforced Rifle Platoon. It must be remembered that the Chinese Forward Defended Locality was nowhere further than 200 metres from the front bunkers of B Company, and at times the standing patrols, usually of an NCO and six were at times mere metres from similar enemy standing patrols.
Prior to the move platoon commanders spent a 24 hour period in the line with the King’s platoon commanders as part of the familiarisation process, and accompanying one of their standing patrols, in the case of B Company, to Green Finger and Ronson, two very close relationship positions with the enemy. One of the lessons learnt on these missions was to keep off the radio net unless something was urgent. The carry of radio static and voice on a still night carried well into enemy territory. No fighting/ambush patrols were to be sent out.
The preparation for the move meant that only essentials were to be carried, as the full complement of equipment including ammunition was to be man-carried in from the debussing point, a distance of about 2 kilometres, certainly for those occupying the forward positions. The move of the Brigade was to be over two nights, the 9th July for 2RAR and 10th July for 3RAR.
The movement of the Battalion from Area 6 was anything but smooth, and the convoy of trucks jammed with other traffic throughout the short transfer. Military Police were seemingly unable to un-jam the blockage and rather than the forward companies, B Company and C Company taking over the HOOK positions at first light, it was about 1000 hours before all the troops were in position and the King’s companies withdrawn. By contrast, and from later intelligence, the Chinese Division who initiated the attack on the HOOK later in July, moved on foot some 60 kilometres in just over 24 hours to take over their position.
A very rapid familiarisation began in each platoon area and those tasked with the night standing patrols given a briefing of routes out and in. The sniper section of SGT Hansen, PTE Tupper and PTE Ray were stationed at the furthest point forward of the forward platoon.
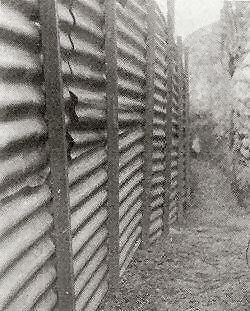
The defences were still in a very run down state after the bombardments of May 1953 and to us there seemed to have been little done to rectify the situation. Digging during the day was not possible and this was perforce a night operation, when a platoon or more of the Reserve Company would be marched forward to undertake digging and revetting work. There gradually took shape a well constructed bunker system, designed and supervised by a first class Assault Pioneer platoon. By the time of the Truce a well constructed cut and cover trench system was nearing completion.
In the meantime where trenches had collapsed through enemy shell and mortar attack, one kept fairly low to the ground. The bombardments in July virtually reduced the well developed trench system to a shallow gutter, so heavy was the enemy artillery concentration. Here, the same section of trench system is shown after the bombardment.
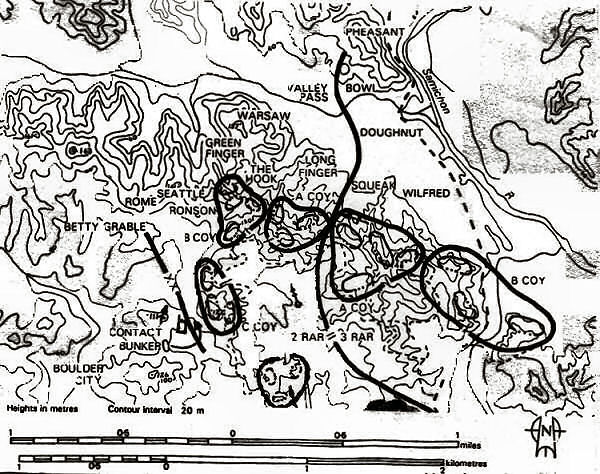
The left flank of the Battalion was secured by C Company, and on the saddle connecting their position to the right flank of the 1st US Marine Division, a Contact Bunker was established and manned by a Corporal and six men. Further in to the 2nd Platoon, Company H of 3rd Battalion of the 7th Regiment was a 2RAR medium machine gun section. This was in the Main Line of Resistance and tasked to fire across the front of 2RAR, as was another section of medium machine guns located within A Company of 3RAR as shown on the altered map from the Official History.
Some very strong enemy pressure had been applied to the infantry and the MMG section on Hill 111 on two early occasions before the main HOOK battle. While the objective was not actually Hill 111, but rather Berlin, East Berlin and Boulder City, those on Hill 111 took a battering on 8/9th July and again of 19/20th July, and on both occasions the 2RAR MMG section played a major role in assisting in the defence of Hill 111.
Shelling and mortaring on all positions of the Battalion were a constant and accounted for nearly all the Battalion’s casualties. The nightly standing patrols were seldom missing a fire-fight with the enemy. It was afterwards revealed that enemy tunneling had occurred underneath the spur line to Green Finger, and it is thought that the enemy laid up here during the day and were very quick to come into action at last light. As with all patrolling at this particular time in the war, the dash to make position first was important. The loser in the race usually suffered the most casualties.
Normal patrolling and stand–to during darkness continued through July and the tempo of operations added to ‘fatigue creep’. The constancy of the work of digging during the night, the constant bombardment by the enemy and the lack of sleep probably had some effect on all ranks in the Battalion. On 22nd July there was a changeover of B and D Companies, with B Company going into Reserve.
A Special Intelligence Report has come to light about the following several days and is included here:
- The Actions SOUTHWEST of the HOOK 24/25, 25/26 July 1953.
- By 1200 hrs on 24 July 1953 a very heavy bid-up of wireless nets opposite 1st Commonwealth Division was evident. In a matter of hours the number of extra out-stations had in fact increased to an extent where an attack of some considerable size was indicated.
- The main additions to the already building net were mortar and artillery out-stations, including one of a known 122mm artillery battery. Additional Infantry was also noted.
- Early on the evening of the 24th a report from special sources indicated that at least a Company was to be employed NORTH and NORTHWEST of the HOOK and that other forces had been warned for duty to the WEST It was clear that the above forces were to create a diversion and draw fire in fact to split the defensive fire support.
- The battle had barely started when the enemy ordered more troops to move forward towards the HOOK area. This move started but was stopped by heavy machine-gun fire causing many casualties. Meanwhile small groups of the enemy were being moved to the SOUTHEAST from rear of WARSAW and LONG FINGER. These troops were told to observe carefully and report the location of any fire positions.
- At the same time to the West the enemy was forming up two Companies on the reverse slopes of BETTY GRABLE and phasing two other companies up. In addition at least two forward observation groups were edging slowly :-
The task of these flanking groups was to make a fire corridor for the forward observation groups moving westward in order to allow them to get into position between Hill 111 and 121.
- Along the valley SOUTH of line SEATTLE/RONSON
- Towards a point between Hill 111 and 121. This latter group was about 5 to 8 strong and was flanked by two groups of about 10-15 each.
- The movement of the southernmost forward observation group was successful; it got through although its flank guards were badly shot up. Soon after it was giving fire directions onto friendly mortar positions from a sheltered spot just west of the junction of Hills 111 and 121. The other group ran into more difficulties and was not heard of again.
- As the enemy proceeded to form up in area BETTY GRABLE, he was heavily shelled but his control ordered a move forward by two companies and called on a further two companies to be ready for battle. One of the companies in the first wave was involved on Hill 111; of the others the majority were caught in the open west of BETTY GRABLE and suffered very heavy casualties. Eventually the two rear companies behind BETTY GRABLE were caught by VT fire and also suffered severely. Confusion reigned for over thirty minutes while dead and wounded were collected.
- The troops moving against Hills 111 and 121 were urged to press on and were told that things to their right were going well. However their casualties continued to mount steadily from tank and machine-gun fire from Hill 121 area. This fire, the enemy admitted, was very fierce as indeed was the artillery attack which had devastating effect.
- To sum up, a study of the intelligence items from special sources indicates the following:
- Breakdown of troops employed:
- NORTH and NORTHWEST of HOOK-2 Companies
- WEST of Hill 121 and 111- one battle group of four companies
- MLR of two right companies of 1st US Marine Division- Two Battalions
- BOULDER CITY- One Regiment (three Battalions)
- WEST OF BOULDER CITY- One Battalion
- Tasks
- Battalion NORTH of HOOK-diversion to split artillery support
- Battalion group WEST of Hills 111 and 121- to take 111 and 121 and pass through to SOUTHEAST
- Two right companies of 1st US Marine Division-One battalion to take company areas and swing SOUTH
- BOULDER CITY-take and secure it as a firm base for further attacks and particularly to provide a firm right shoulder for development of operations to the SOUTHEAST.
- WEST of BOULDER CITY-diversions.
- The enemy repeated these actions on the night 25/26 July. Intelligence coverage on this occasion, while not as good, still gave indications that a further effort was to be made. Forming-up-places the same as on the previous night and a possible Start Line - track west of Hills 111 and 121-was identified and forward observation groups were heard working very close to the Main Line of Resistance. All these were taken on by our artillery with heavy losses to the enemy.
- These last attacks were not so well controlled. They were urged to proceed, so it seemed, in the hope of success against the recognised and rapidly mounting odds represented by United Nations artillery, machine-guns and tank fire. They were doomed to failure and petered out because of tremendous losses.
- It appears that the attack on BOULDER CITY was intended, if it succeeded, to provide a firm base and a firm right shoulder for development of the effort with particular weight being added against the area along the inter-divisional boundary between the 1st US Marine Division and the 1st Commonwealth Division. There is no doubt that the enemy fully appreciated the possibilities related to a thrust in this direction.
They were first, the river was attractively close and a breakthrough in force might reach it. Secondly, the HOOK which had proved so costly in attacks from the North could be turned. Finally, once the enemy broke through the Hills 111 and 121, the Main Line of Resistance to the WEST could be left under pressure, and a swing to the WEST simultaneously with a dash to the SOUTH and EAST for the river, would roll up the 1st Marine Division’s right flank. If any of these had occurred then the diversionary effect against the HOOK from the NORTH may well have strengthened into a pressure attack to keep 1st Commonwealth Division’s attention to the front.
- Continual emphasis was placed throughout the battle on keeping up the diversionary attacks until the main effort was well under way. Once a firm base on BOULDER CITY had been established and with threats being maintained further to the WEST, there is every indication that the enemy had intended to hurl the battalion group of four companies in a double axis thrust against Hills 111 and 121 and at least two battalions on to the right hand company of the Marines. The first objectives were these four positions. The second and follow-up wave was to pass through, swinging SOUTH. It is probable that both efforts would have been strengthened as they gained momentum. Certainly there were sufficient additional forces to the NORTH and WEST of the PARIS/BETTY GRABLE features to do just this. There is no doubt on one point-had it not been for a few stalwart infantrymen on Hill 121 and two tanks in the blocking position between Hills 111 and 121 and for the speed and flexibility and weight of the 1st Commonwealth Division artillery, the enemy would have broken through. The consequences of such a catastrophe would have been far reaching and frightful, but easy to imagine.
The night of 24/25th July was hectic! From about 2030 hours incoming artillery and mortars were generally at the rate of 30 a minute over most of the two forward companies and Hill 111 with fairly intensive shelling of the Reserve company area, Battalion Headquarters, and the Mortar base plate positions. The actions by individual soldiers, NCO and private soldiers alike, was inspirational. SGT Cooper.s section on Hill 111 was, for some of that night, alone, as the enemy had created a gap between Marines and the MMG section, although eventually retaking the position. The composure of young NCO.s in calling in artillery fire onto their own position was courageous, as was the literally toe-to-toe personal fights around the positions on Hill 111 and the Contact Bunker. The standing patrols on Green Finger and Ronson on that same night were severely attacked and on Ronson, withdrawn after calling in defensive fire tasks. (6) The standing patrol on Green finger led by CPL Len Hayden remained and returned again on the night of 25th/26th July. Throughout these two nights night almost turned to day with the use of the Battalion.s illuminating flares and those continually dropped by an aircraft flying backwards and forwards across the battle zone.
The accuracy and speed with which the Divisional artillery performed in defensive fire task was extraordinary. It is assessed that some 25,000 mixed rounds of shells and mortars were fired against the enemy. The only US shelling was right on target in the C Company, 2RAR jeep-head, all 75 rounds. By this stage of 1953 the Commonwealth Division was a formidable formation.
By first light on 25th July there were scene of great damage, both human and material. The enemy attacked again during the night of 25/26th July 1953, but with less enthusiasm and the attack petered out by early morning.
It is estimated that the enemy dead numbered some 3,000, and for 2RAR’s period on the HOOK, the casualties were 15 killed and 72 wounded. The last two nights before the Truce was signed on 27th July cost the Battalion 5 killed and 24 wounded.
The cease-fire took effect at 1000 hours on 27th July 1953, and one of the conditions was to be clear of the agreed Demarcation Zone (DMZ) within a week. This involved each Company dividing itself into three elements, one element to establish a camp for the Battalion, one element to remove and recover as much as possible of the engineer’s stores and equipment from the line, them demolish what couldn’t be removed, and a third element to scour the whole area between the Forward Defended Localities, for missing soldiers’ remains, weapons and other recoverable material.
The soldiers of the Battalion had performed with steadfast bravery against a full-on enemy attack under the most appalling conditions. Great advance were made to have a foolproof signals line system in operation, but the bombardment saw this blown to pieces. Normal radio traffic became unusable and there was the reliance on CW bands with Morse Code. Torrential rain clogged drainage of the trench system and at times troops were standing waist deep in water. Throughout the period 9th-27th July 1953 the soldiers of 2RAR were indefatigable! Like Australian soldiers wherever they have served they made the most of every situation with initiative, humour and aggression towards the enemy. It was a great Battalion!
Awards for the period 1st to 27th July 1953, and immediate awards, were made as follows:
>Member of the British Empire to LT John William Martin CONNELL and WO II Leslie Ernest MOORE. The Military Cross was awarded to LT Patrick Oliver Giles FORBES; the Military Medal to SGT Brian Charles COOPER, LCPL Kenneth Number CROCKFORD, PTE George Edward KENT, CPL Thomas William MAGUIRE, PTE James Michael McAULIFFE; and Mentioned in Despatches to LT Colin Andrew Collingwood WILSON, CPL Colestin Herbert CHAUVIER, CPL Kevin George CONDON, CPL Kevin Joseph COOPER (Posthumous), CPL Leonard HAYDEN, CPL Joseph Brian SLATER, PTE Keith WEEDING and PTE Donald Albert YOUNGMAN. (5)
By early August the longest serving of the transferees from 1RAR had completed their tour of duty and left the Battalion for home or for posting to Japan, and the first group of Battalion members went on Rest and Recreation leave of five days to Japan. From August onwards the pattern of the Battalion was dictated by the need to establish in detail the new Kansas Line position as a fixed defensive position. This was not a pleasant task as with the onset of winter, digging became extremely hard with the freezing of the ground.
Sporting fixtures were arranged between and among units in the Division and the 16th New Zealand Field Regiment won the Rugby competition with 2RAR as runner-up. 2RAR won the Divisional Volleyball competition against a Canadian unit
On 17th April 1954, the Battalion arrived back in Australia in the same vessel, it having carried 1RAR to replace 2RAR, a reverse of the previous years situation. By May 1954 the Battalion had begun re-forming at its new base at Enoggera , Queensland, but with a series of re-postings only seven original officers remained with the Battalion and about the same number of the original senior NCOs. About one Company of soldiers returned to the Battalion, and these were formed into one company, A Company.
LTCOL Larkin left the Battalion in late August 1954 to be replaced By LTCOL J Ochiltree who had been a Defence Attache in Washington DC. Life for the Battalion revolved around some fitness training, a succession of military funerals for former senior officers, and the special training for these consumed large amounts of time and energy, and the usual chores associated with being only a tram ride away from a Command Headquarters. All these tasks were accomplished with very few soldiers.
By early 1955 a steady stream of recruits flowed into the Battalion and a number of young officers form RMC, Duntroon and from OCS, Portsea. Training for jungle warfare commenced in early 1955 at the Jungle Training Centre, Canungra (now the Land Warfare Centre), with each Company rotating through the tough course. The Battalion had been warned for service in the Malayan Emergency and the tempo of training proceeded at an increased rate. By mid 1955 only two original officers remained to take part in the forthcoming operations.
On 28th September 1955 the Governor-General, Field Marshal The Viscount Slim KG, GCB, GCMG, GBE, DSO, MC presented the Queen’s and Regimental Colours to the Battalion in an impressive ceremony at Victoria Park, Brisbane to be followed by a march through the City. These were the first Queen’s and Regimental Colours to be presented to a Battalion of the Regiment.
The Battalion embarked in the MV Georgic for Malaya in October 1955.
- LTCOL RL Hughes, MAJ FL Skinner, CAPT K Hatfield, CAPT L Eyles, CAPT K Hatfield, LT J Hooper, LT FC Smith, LT AL Limburg, LT E Boyd, LT JH Skipper, LT J Black, LT McMasters, LT RDF Lloyd, LT J Burns, LT CN Khan,
- Embarkation Nominal Roll. 2RAR War Diary AWM 85 (313)
- Bn HQ: F Larkin (CO), CAPT JB Wells (Adjt), CAPT H Gayst (RMO), CAPT JJ Campbell (OPD Padre), LT RVP Feehan (IO), WO1 PG Steer (RSM),, WO2 Fletcher (Bandmaster), SGT RG Hansen, SGT AS Fitzsimmons, SGT PN Ellem, SGT TR Kelly, SGT RE Bell, SSGT LM Johnson, SGT R Levitt,
- A Coy: Gardner, LT CA Wilson, WO2 MAR Jury, SSGT JP Sheddick, SGT NH Hollingdrake, SGT GM Black,
- B Coy: Passlow MC, CAPT AC Gordon, LT BR Adams, LT HR Downey, WO2 PC Smeaton, SGT R Tarr, SGT RW Grebby, SGT HD Clively, SGT LH Ewington,
- C Coy: Woodhouse, CAPT JH Lewis, LT D Allen, SGT DN Candow, SSGT AJ Burgess, WO2 LEM Moore, SGT KJ Hamilton, SGT WJJ Bruce,
- D Coy: MAJ K B Thomas MC, CAPT IM McKenzie, LT FX Crowe, SGT K Jones, SGT RM Askew, WO2 WV Lawlor, SGT K Foran, SSGT K Crichton,
- Sp Coy: MAJ TH Wilson, LT POG Forbes, CAPT CS Walsh, LT MT Frost, SGT N Whitecross, SSGT KC Berry, SGT AW Bailey, SGT DA Jordan, SGT RF Smith, SGT BR Maxwell, SGT WB Carpenter, SGT FA Nicholls, SGT LD Currie, WO2 LT Foale, SGT CW Curtis, Sgt EC Sutton, SGT BC Cooper,
- HQ Coy: MAJ IE Kerr, WO2 VAAN Fox, SGT DJ Hansen, SGT J Acol, SGT F Myles, SGT ES Waterworth, WO2 JG Gerrans, SGT V McEllister, SGT JE Summers, SGT AF Wilson, SSGT J Lloyd, SGT AE Deacey, SGT GT Layton, SGT A Wells
- Nominal Roll of 2nd Battalion The Royal Australian Regiment, Korea, 1953-1954. 2RAR Association Inc Publication, July 1999. (Available from the 2RAR Association, PO Box 1097 TOOMBUL 4012 Price $7.50)
- The publication containing the Citations is available from the
- 2RAR Association. Price $15.00. PO Box 1097 TOOMBUL 4012.
- Notes on the Defensive Fire and Harassing Fire tasks of the Battalion’s MMG and Mortar platoons.
- On Hill 159 between 5th May and 16th June 1953 there was one section of MMGs on the left forward feature and two sections and platoon HQ low down on the spur behind the Anti-tank platoon with the task of firing almost due west along the Bowling Alley.
- The location of the MMGs on the HOOK was as related and as shown on the map on page 4. Nearly all shooting was done "off the map" using dial sights. This was quite accurate although there was the usual problem with map enlargements causing map distortion in the process as did moisture. Using an eight figure map reference was quite useless to the rifle companies who had to rely on 1:50,000 maps. An example of a 1:25,000 map of the Hill 159 position illustrates this, below.
- The Machine-guns used Mk VIIIZ ammunition with alleged maximum range of 4,500 yards, but were rarely fired over 3,500 yards. The ammunition proved good, but the barrels stripped their rifling after a few thousand rounds and had to be replaced. The factory loaded belts were poor with loose rounds causing many stoppages.
- The one mortar base plate position on Hill 159 was at the rear of the at about the grid reference 150175 (see above). On the HOOK there were two base plate positions, not too far from where they are shown on the page 4 map. Mortar Fire controllers were located on Hill 121 with C Company, on the HOOK with B and later D Company, and the two 3RAR Mortar Platoon fire controllers were situated in their forward platoons.
- The 2RAR Mortar platoon had six Defensive fire tasks and thirteen counter mortar tasks.
- The MMG platoon had twelve defensive fire tasks and the 3RAR defensive fire tasks were four. The Durham Light Infantry, one of the Reserve Battalions, was also tasked with MMG and Mortar defensive fire tasks.
- When not engaged the 2RAR MMG sections were laid on Warsaw and Seattle.
- Calls for MMG fire could only be sanctioned by Company commanders, and for mortar support through the mortar fire controllers to the Officer Commanding Support Company.
|
|